Monday, October 31, 2011

Cuban Sandwich

  • 1 loaf of Jimmy John’s bread, cut into 8″ slice (other options, french roll, or seedless hoagie)

  • Sliced ham (I used Wisconsin’s finest Sunday boiled ham, thinly sliced)


  • Slow roasted pork cooked in mojo (see below)


  • Dill pickle slices


  • 2 slices of Baby Swiss Cheese, per sandwich


  • Mustard (optional)


  • Butter


  • Ingredients for Pork:
    • 3 lbs of pork shoulder
    • 1 head of garlic, skins removed, smashed
    • 2 lemons, juiced
    • 1 cup of orange juice
    • 1 lime, juiced
    • 2 tbsp salt
    • 1/2 tsp Mexican oregano
    • 1 tbsp olive oil
    For the pork, mix all of the ingredients, excluding the pork, in a bowl. Take a knife, and create large slits into the pork. Add the pork to a large, sealable plastic bag and dump the marinade into the bag. Massage the pork, seal, and let it marinate for at least four hours. When you are ready to cook, you can throw the pork, and marinade into a slow cooker, or roast in the oven until cooked.
    Start by getting everything ready, and set it out on the counter for at least 30 minutes. Everything should be room temperature, and I mean everything. This allows everything to cook together nicely and get evenly cooked.
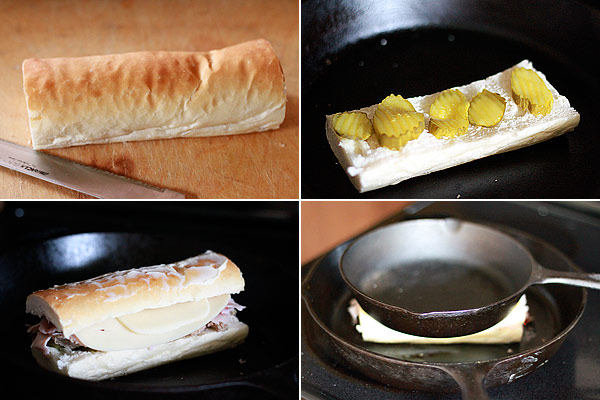
    When you are ready, I recommend getting heavy cast iron skillets out if you have them. The goal is to create a heavy press, and cast iron not only heats really well, but it has the weight you are looking for to press the sandwich.
    Build your sandwich by adding the pickles to the bottom layer, or if you want to use mustard, spread a light coating of mustard before adding the pickles, then top with roasted pork, ham, and top with cheese. Add about one tablespoon of butter to the skillet that is on medium-low heat. Take the sandwich and massage it into the butter. Take another tablespoon of butter and spread it on the top part of the bread. Lay another cast iron skillet on top of the sandwich, and carefully press down. If you do not have the second skillet, you could wrap aluminum foil around a brick, and use that as your press. Be creative, but find a clean, heavy pot or pan to lay on top of the sandwich.
    Leave the sandwich alone for a few minutes, however monitor the heat. You definitely do not want to burn the bread, so lower the heat a bit if you are concerned. The goal of the sandwich is to build an amazing crust and have the cheese melt. After a few minutes, flip the sandwich over, add the skillet back to the top of the sandwich, give a little press, and cook another few minutes. The sandwich is done when the cheese is melted, and your crust is complete. You know the crust is complete when you tap on the sandwich and you get that sound. You’ll know the sound, and it is a beautiful one at that.
    Take the sandwich, let it rest for a few minutes, then slice on a diagonal. The result is everything, and a bit more. The exterior is so wonderful, and biting into it you will know first hand why this sandwich is really great. It could be the combination of flavors, or it could be the balanced textures. Whatever it is, the Cuban sandwich is a must make, and what a better time to make one then today or tomorrow! Enjoy

    Cuban Sandwich Recipe

    Other options...go to Publix and buy 1 ...ha ha or go to Publix deli and tell them that you want to make a Publix cuban..they will give you the cheese, the pork, and then, get the bread..hoagie rolls, get pickle relish and mustard (get a good brand of mustard..maybe Boar's Head) and make your own...after you compile the sandwich, stick in the oven and melt the cheese or put on a panini press.

    Chocolate Spoons for Hot Chocolate or Coffee


    While you melt the chocolate, either in the microwave, or over some simmering water, you need to make your spoons level so that when you pour in the liquid chocolate, it doesn't spill. I simply propped them up .You could use anything suitable - the edge of a plate or chopping board, for example.


    Then, spoon in some chocolate.Then you simply go mad with whatever small sweets, silver balls and sprinkles you have. Jelly beans are a must - we all agreed they go nicely with the chocolate, however odd that may sound. If your sweets are chocolate themselves though, wait ten minutes before putting them onto the molten chocolate, just in case they also start melting.

    I have made these simply by dipping a spoon into the chocolate..you can use to stir hot chocolate but one thing that I have done over the years is to put a hazelnut or some other "coffee flavoring" in the chocolate and then, I stir my coffee with it.  So delicious and you can give them as gifts.  Get cute little plastic bags and decorative ribbons and give give give to those that you love and want to impress.

    Christmas - Cherries Dipped in White Chocolate


    How great do those cherries look dipped in white chocolate?  They will definitely be served at my house this year. 

    Peanut Butter Truffles

    Peanut Butter TrufflesHow yummy is this?  I have a different recipe for Peanut butter balls that I make each Christmas..but I may shake things up a bit and try this..this recipe is "definitely not your mother's recipe".
    Ingredients
    • 2 cups sugar
    • 1 5 ounce canevaporated milk
    • 1/2 cup butter
    • 2 cups tiny marshmallows
    • 3/4 cup creamy peanut butter
    • 1/2 teaspoon vanilla
    • 12 ounces dark or bittersweet chocolate, chopped
    • 2 teaspoons shortening
    • Finely chopped peanuts (optional
    Directions
    1. Butter the side of a medium heavy saucepan. In the saucepan, combine sugar, evaporated milk, and butter. Cook and stir over medium-high heat until mixture is boiling. Reduce heat to medium; continue boiling at a moderate, steady rate for 12 minutes, stirring occasionally.
    2. Remove saucepan from heat. Stir in marshmallows, peanut butter, and vanilla. Transfer mixture to a large bowl. Chill for 45 minutes to 1 hour or until mixture is thick and can be molded.
    3. Line a large baking sheet with waxed paper or parchment paper. Shape mixture into 1-inch balls; place on the prepared baking sheet. Freeze for 15 minutes.
    4. In a medium saucepan, combine chocolate and shortening. Cook and stir over low heat until melted. Dip balls, one at a time, into melted chocolate. Let excess chocolate drip off balls. Place on a wire rack set over waxed paper. If desired, sprinkle with peanuts. Let stand until chocolate is set.* Makes about 50 truffles.

    Garlic Baked Shrimp


    I love shrimp..this looks delicious..from realsimple.com...I am going to try this.

    Ingredients

    Directions

    1. Heat oven to 425ยบ F. In a baking dish, combine the shrimp, garlic, white wine, ½ teaspoon salt, and ¼ teaspoon pepper.
    2. In a small bowl, combine the butter, bread crumbs, and parsley.
    3. Sprinkle over the shrimp and bake until the shrimp are opaque throughout, 15 to 18 minutes.

    Friday, October 28, 2011

    Candle Crafts...So pretty from Pinterest.com

    Doilies are dainty. Candles are romantic. Burlap is rustic. Here I’ve combined all of them to make these pretty luminaries that would be great for a romantic Valentine’s Day meal or even as a wedding reception accent. Play around with different ribbons, buttons, twine and burlap while experimenting with various doily designs as well.
    I found my doilies at the thrift store for about $0.35 each. I tried paper doilies but they aren’t as pretty and they are solid in the center, missing the lovely designs that real doilies possess. Because I only had a few doilies on hand, I only put them on one side of the jar, however you could place them on both sides if you like. They look lovely on their own or with a lit tea light glowing inside.
    Burlap and Doily Luminariesprintable version
    Glass jars
    Adhesive spray (like Elmer’s Craft Bond)
    Doilies
    BurlapTwine, buttons, and/or ribbon
    Make sure your jars are clean and dry. Spray the jar with adhesive spray. EDITED: A commenter, Peechee, suggested spraying the doily rather than the jar to avoid having dust particles etc cling to the glass where the doily doesn’t touch. I think that’s an excellent idea! I haven’t tried it myself, but would love to know how it works out if someone does try that. EDITED AGAIN: Have heard from another visitor that in fact spraying the doily works great!
    Funny thing is I tried this project with paper doilies first and I DID spray the paper doily and then place it on the jar. No idea why I didn’t do that with the real doily. Duh! The only problem I could see would be that the doily might flop onto itself causing it to stick to itself. so maybe instead spray the doily, leave it on the table, then place the jar onto the doily!
    Place the doily onto the jar and position it, making sure it’s not bunched up anywhere. Press in place.
    Spray the rim with adhesive, then wrap the jar rim with burlap.
    You can also wrap the rim with pretty ribbon then tie a piece of twine around the rim as well. Tie them both in a bow.
    Another option is to use the canning jar lid, then wrap that with twine or loose threads from your burlap. Thread two of the ends through a button and tie in a knot.

    Larkinsville

    Larkinsville, a tired old Southern town nestled in the foothills of Northeast Alabama, lost its glory after the war between the states.  She curled up and slept through the next hundred years.  Scottsboro, a neighboring town with the Tennessee River making up its glory, took advantage of the tired old farmers and the sleepy cotton pickers who had fought so valiantly on one side of the war or the other,  Larkinsville was eliminated from becoming the county seat of Jackson County due to a requirement that the county council decided upon:  The town must be near the center of the county.  Yep, those devils wrestled the seat away from Larkinsville. The county seat had previously been Sauta Cave. 

    So, dear old Larkinsville withered away and died.  The only hotel that once stood with its stately white columns and wrap around porch sold.  The bank crumbled almost to the ground and the jail, well, I guess the jail became an outhouse or just withered like everything else.  We were left with a Depot, a post-office and a small grocery store.  The rolling store ran once a week.

    The beautiful old hotel became a home and most of the rooms were closed off.  It is said that the new owner's wife died and as her body lay in state in the main parlor, the old player piano thta still stood the in the "saloon" part of the  house, began to play "Cotton-Eyed Joe" for all of the mourners.  Maybe it was imagination, maybe not, but some folks claim that there was a swirl of smoke in the air that looked like rebels dancing a jig.

    Yes, Larkinsville sent its sons to war again and again but remained a tiny dot on the map.  Cotton crops dwindled and soy beans took over.  Then, the country elected a Catholic president, the Reverend Marin Luther King began stirring folks up all over the South and Larkinsville sprang to life again. Well, not for all of the right reasons?  You decide.  The KKK sneaked into Larkinsville one night and stuck crosses in several yards, set them a blaze and rode off into the stillness of the night.  And, if that wasn't enough to wake the dead, Ruby moved into the shack across the railroad tracks.

    How cute is this?

    Pinned Image

    Take a wine glass and a small small lamp shade and a tea light..and look what you have?

    DIY Solar Lights...

    From Ace Hardware for $4 ---actual light
    It easily popped apart and I just put it into the jar.
    I took the clear plastic part off.


    The tutorial says to mount it to the top of the jar but I didn't do that. 

    I may have to flip it over from time to time to make sure the solar cell is getting charged.
    It looks even better when it gets really dark out but then my photo wouldn't have come out.
     I like how it turned out,even though it doesn't have the same amber glow as the inspiration jars.  I can experiment with different jars and solar lights.
    Total cost=$6!


    Witticisms ---

    It 's not whether you win or lose,
    but how you place the blame.                                 

    You are not drunk
    if you can lie on the floor                                 
    without holding on.


    We have enough youth.
    How about a fountain of "smart"?                                
         

    The original point and click interface
    was a Smith & Wesson.

    A fool and his money
    can throw one heck of a party.                                 

    when blondes have more fun do they know it?

    Five days a week my body is a temple.
    The other two it's an amusement park.

    LEARN FROM YOUR PARENTS' MISTAKES
    USE BIRTH CONTROL

    Money isn't everything,
    but it sure keeps the kids in touch.

    Don't Drink and Drive
    You might hit a bump and spill something.

    If at first you don't succeed
    skydiving is not for you..

    Reality is only an illusion
    that occurs due to a lack of alcohol.                                 

    Time's fun when you're having flies.
    ......Kermit the Frog

    We are born naked, wet and hungry.
    Then things get worse.

    Red meat is not bad for you
    Fuzzy green meat is bad for you.

    Ninety-nine percent of all lawyers
    give the rest a bad name..

    <> One good thing about Alzheimer's is
    you get to meet new people every day.

    Xerox and Wurlitzer will merge
    to produce reproductive organs.

    Alabama state motto:

    At least we're not Mississippi                                 

    ARTIFICIAL INTELLIGENCE IS NO
    MATCH FOR NATURAL STUPIDITY.

    The latest survey shows that
    three out of four people make
    up 75% of the population
    A banana is like a politician...
    when he first comes in he is green, then he turns yellow and then he's
    rotten.
    Congressmen should wear uniforms like NASCAR drivers so we could
    identify their corporate sponsors.

    Homemade Lip Balm

    Homemade lip balm, infused with your favorite scented oils, will make your lips delicious while smoothing and softening them. Using essential oils (such as lime, lemon, tangerine, grapefruit, or peppermint), you can customize this basic recipe, which consists of unscented oil and wax. Purchase tubes and plastic tubs like the ones shown here (cosmetics jars are also ideal). The recipe yields 1/2 ounce.
    Ingredients: 3 teaspoons grated unbleached beeswax; 5 teaspoons carrier oil (sunflower, castor, or jojoba); 6 or 7 drops essential oil; 1 teaspoon honey, for flavor

    1. Melt the beeswax and carrier oil together in the top of a double boiler, stirring to combine. Remove from heat; add honey and essential oil. Mix thoroughly so the honey does not clump.
    2. To add a little color, stir in a tiny dab of lipstick with a coffee stirrer. Pour the mixture into containers; let sit 20 minutes before covering or moving. For glossier lip balm, use 2 teaspoons wax and 8 teaspoons carrier oil.

    This is really easy to make and it is so so good for your lips.  I found this recipe on Martha Stewart's website; however, I have the same recipe and have made this, from a book of homemade remedies, cosmetics, etc. that I have.

    Thursday, October 27, 2011

    Still Friends....Ah, reminds me of Payne's Drug Store and Carol

    Pinned Image

    I found this on Pinterest.com.  I love that site.  It is just the best.  And, my dear bestest friend ever, little Missie..if you see this, you know that it is for you!!

    Wednesday, October 26, 2011

    Portrait of Memma - with Memma's Help

    I am working on a portrait of one of my Memma.  You can just read my blogs and know that she was such an influence on me.  She was always there for me and I loved her beyond words.  So, I decided to paint a portrait of her.  I started with the drawing from a picture that was made on her 90th birthday.  (She died 7 years later).  I began the drawing and was pleased with the results.  Then, I began to lay the paint to the canvas (so to speak).  Well, I kept telling myself not to lose "the look" or likeness.  Unfortunately, boom!  I looked at the painting and all of a sudden it was like, "who the heck is this person?" 

    Once, I was working on a painting, this was after she had died, and I actually swore that the reason the painting turned out so great was because I wore her sweater while I was painting.  I call it my good luck sweater. 

    So, back to my portrait.  I looked at the eyes that in the drawing had looked so like her.  Just wasn't cutting it.  I looked up to heaven and declared, "Memma, I know that you are up there watching me.  I need you to help me get this right.  I will NOT give up, so you may as well belly up to the bar and take this out of my hands."

    Yawl think I am crazy, don't you?  Well, I don't know what happened.  But, suddenly, I just loosened up (something that I have a very hard time doing with painting..VERY!)  And, walla..Memma was back. I still have a lot of work to do on the painting and will post when finished.  She was wearing her favorite dress in the photo, one that her favorite granddaughter bought for her.

    Note:  to Charlene and Jo...just kidding about the favorite Granddaughter thing....sort of kind of.....

    Cookie Bowls

    Sugar Cookie Bowls

    Make these and put a scoop of ice cream inside the cookie cup, squirt chocolate syrup over it and top with a cherry or your favorite fruit or tidbits of candy, and there you have a great treat. 


    Ingredients:

    • 2 3/4 cups all-purpose flour
    • 1 teaspoon salt
    • 1 cup (2 sticks) unsalted butter, softened
    • 1 1/2 cups granulated sugar
    • 1 egg
    • 1 1/2 teaspoons vanilla extractEasy-Add vanilla extract
    • 1/2 teaspoon No Color Almond Extract
    • Instructions:

      Step 1

      Preheat oven to 350°F. Spray the outside of each bowl cavity of Ice Cream Cookie Bowl Pan with vegetable pan spray.

      Step 2

      In medium bowl, combine flour and salt. In large bowl, beat butter and sugar with electric mixer until light and fluffy. Beat in egg and extracts. Add flour mixture to butter mixture, 1 cup at a time, mixing after each addition.

      Step 3

      Roll out dough on generously-floured surface to 1/8 in. thickness. Cut 4-1/2 in. circles from dough.. Drape one circle over each bowl cavity of pan, pressing to form smooth surface.

      Step 4

      Bake 11-13 minutes or until cookie cups are firm and golden brown. Cool on pan on cooling rack 10 minutes. Loosen bottom edges of cookies from pan using small spatula. Carefully remove cups from pan and cool completely. Wash, dry and spray pan; repeat with remaining dough
    OR, you can just buy the cookie dough and spread over the muffin cups...from step 3 down

    Grapes on a Stick

    Pinned Image

    I had these in South Florida..this is a great summer appetizer or rather...teaser.  All you do is put the grapes on a stick, freeze them, and eat them.  I didn't actually have them on a stick, I made them individually.  You can also sprinkle powdered sugar on them to add a different touch, but I did not and don't really recommend.  But, this is so good!

    Hi Hat Cupcakes

    Hi Hat cupcakes


    Mmmm ... what delight of cupcakes! Bakerella has done it again: from an original recipe from Martha Stewart, prepare a meringue frosting over some chocolate cupcakes, that once frozen and dipped in chocolate chips, results a spectacular sweet! Do you dare to bake it?
    Hi Hat cupcakes

    Cheddar Biscuits (Red Lobster Biscuits)

    Tuesday, October 18, 2011

    Birdseed feeder

    Take an empty tube of toilet paper, Spread on your peanut butter. I used organic, no sugar peanut butter and roll it in birdseed...slip it over a branch on a tree...an WALLA...you have some food for your fine feathered friends.
     

    T Shirt Quilt from Pinterest

     
     I have always wanted to turn Matt's old baseball, basketball, and football T-shirts into a quilt..I found this on Pinterest.com.  It is from Cinnaberry Suite blogspot.  Looks simple (hmm, yea right).
     
    What you need:
    This  is a fancy Fiskars rotary cutter. .
    If you don't have one, grab them scissors, you'll need them too!


    Here's a full picture of the cutter. 
    You will also need a mat to cut on top of if your using one of these. 


    You'll need some flannel or "warm and cozy" fabric. 
    We are using this as a batting.
     I used an old flannel sheet.


    Old T-shirts


    And obviously a sewing machine and pins.

    How to make the quilt:
    • first: cut your shirts into squares. I cut mine into an 11in x12in square.  
    Just cause. 
    {Below is a picture of my template}
    You make yours however big or small you'd like!


    So, decide how big you want your quilt to be and
    how many squares you will need to make it that big.
    I know,
    way too much Math!
    Cut, cut
    away your little squares until you have the amount you need.
    Remember, watch out for those fingers! 


     As you can see, I cut right through both sides of the shirt,
    all at once.
     You will end up with two squares. 
    A front and a back.
    Just make sure your template is lined up with whatever logo 
    or picture you are trying to cut out. 


     I also used their old polo shirts from school. 
    They are way too old to give away, but I hate to throw them away.
    Here's to a new life little shirt!


    Here they are all cut and fabulous...

    • Second: Cut out your flannel.  Use the same template you used to cut out  your shirts.  You need one piece for every set of squares you have.  It will be sandwiched between each front and back piece

    • Third: Make your TS & F sandwich. 
    {T-shirt and flannel sandwich! yum!}
    Pin them together.  Please take note: My pins are going the wrong way. 
    Turn yours in, or your sewing machine will eat them!

    FO REALZ!!


    • Fourth:  It's time to sew.  Each sandwich will get a big X sewn through the middle of it.  Just start at one corner and sew down to the other.
    I have one line down in the picture below. 

     {My girlie sat at the table and talked to me as she played with her playdoh and I sewed away.
    Making memories :) }
    •  Fifth: lay them out in the order you want them to go.
    Pin them together.  With a small seam allowance on top with the right sides up.
    Hope that makes sense!

    Just look at the picture. 
     Pin it like this. 
    Make sure you have all your sandwich layers in there.


    • Sixth: Sew your squares together. This time you will have to pay attention so all your seams are the same. I don't know exactly how far in I sewed them together.  Just eyeball it.  Make sure you have enough to cut little slits into later. I lined my edge up with this  piece of tape on my sewing machine. I knew as long as my edge was lined up to it I was going pretty straight.


     Here they are all sewn together!
    I did 6 squares for each row.
    • seventh: MAN! This is one LOOOONNGG tuttie!
     PEEEUUUWW!


    Cut your strings and then get to cutting the little slits along the seam. DO NOT cut all the way through the seam you sewed. You'll have a huge hole in your purdy quilt.


    •   eighth: Sew the rows together.  Repeat, until they are all sewn into one big fabulousness!
     Line the rows up square to square and pin them just like you did to the squares with a small seam allowance.


    Oh and don't forget,  Snip, snip all along that seam too!

     Sew a small seam all the way around the edge of the quilt.
    Then, you will snip around those edges to.
    You will hate your scissors after this one!
    Make sure your scissors are sharp.  Otherwise, one word,
    Blisters!
    Don't forget to throw it into the wash so all the snips can fray.
    Here is our new row added to the rest of it's t-shirt friends.
    Don't they look so happy together?!

    I'm going to continue adding to the quilt I already made. 
    I will keep adding rows until it's big enough to cover the whole bed!
    Almost there!


    Happy safe sewing! :)